Monday, March 1, 2010
Forgot to Mention Histograms
We were also able to extract RGB histogram information on the detected faces and bodies out to a text file...more visuals to follow...
Fresh off the Farm: Camshift to Track Detected Faces
Thanks to Robin Hewitt!! for the very helpful Camshift wrapper.
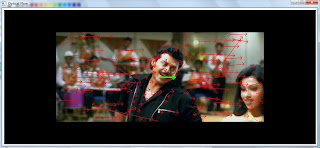
We decided to include Camshift to compensate for the intermittent face detectors.
Also, realized that the Modesto Castrillon-Santana's Head and Shoulders haar cascade classifier has a far better detection rate than the standard face haar cascades that come with OpenCV.
the camshift failing towards the end here-- fair enough as she turns away her head.
We should do something about resetting the camshift tracker at the beginning of each shot. Also, we still need to implement camshift for multiple faces/people. Also, we should implement some sort of error checker...so as to not have the camshift tracker get carried away(pun intended.)
Thursday, February 18, 2010
Good Progress on Shot Detection and Face/Body Detection
We have made much progress since the last time we posted.
1. We have implemented shot detect using the optical flow vectors and organized the output. So when the video is finished, a folder is created that is named "moviename_out". Within this folder, two folders are created, one called "all_shots" and one called "shots". The point of the "all_shots" folder is to store all of the clips cut that are actual shot boundaries and also when the frame moves too much in one direction. When either of these happen, we cut the clip and output it to the "all_shots" directory. The "shots" folder just contains the clips that are from actual shot boundaries. This is just for convenience for the user.
Here is a picture of inside the "moviename_out" folder:

Here is a picture of inside the "shots" folder:

Here is a picture of inside the "all_shots" folder:

2. We have made some progress on detecting faces also. We found that using multiple haarcascade classifiers for face detection provides better results than using only one, as expected. We have ran the program on a few videos and found the detection of faces to be satisfactory. Note that we have only used 2 different haar classifiers, one that shows in red and one that shows in green. For the first picture and video, we only used 1 classifier, while with the next video we used 2 different classifiers. We have many more that we will test out in the future. Here are some results from the detection:
The first picture and video is just using 1 classifier.
A picture showing the detection of about 6 dancer's faces along with their body:

Here are a couple small clips that is associated with the above screenshot:
Here are 2 clips of a different video that is using 2 haar clasiffiers (one in red and other in green):
Monday, February 15, 2010
Thursday, January 28, 2010
Camera Stabilization Paint Trail
We have implemented video trails to further help body detection. These trails are meant to retain the background as our image moves out of the ROI as a direct result of camera stabilization. In the previous post, we have camera stabilization without the video trails, in the following two videos, we have implemented video trails. The first video has the optical flow vectors showing. The second video doesn't have the optical flow vectors. You can see at various points of the video when the frame is moving out of the ROI, the background information is retained.
Wednesday, January 20, 2010
Optical Flow and Padding. Possible Shot Boundary Detection
Result of Optical Flow Program:
-Red vectors for optical flow vectors
-Green vectors for median optical flow vector
Input 1
Ouput 1
Input 2
Output 2
Output 2.1
We have also been able to zero pad the whole video, however we had some trouble outputting it to a video so here is a screenshot:
We've also noticed that we might be able to detect shot boundaries with precision. For every frame where we calculate the median optical flow vector, we noticed that at every actual shot boundary there is a large jump of the median optical flow vector values. So we are going to investigate this precision more and compare it to the shot detect software that we were previously using. We then will decide what would be the best approach to the problem. Here is an example of the output of the median vectors:
#### -1,2 ####
#### -1,1 ####
#### -1,2 ####
#### -1,2 ####
#### -1,2 ####
#### -1,2 ####
#### -1,2 ####
#### -1,3 ####
#### -1,3 ####
#### -1,2 ####
#### -1,1 ####
#### -1,1 ####
#### -1,2 ####
#### -1,2 ####
#### -1,2 ####
#### -1,1 ####
#### -1,1 ####
#### 0,2 ####
#### -1,2 ####
#### -1,2 ####
#### -1,2 ####
#### -1,2 ####
#### -1,1 ####
#### -1,1 ####
#### 0,1 ####
#### 0,1 ####
#### 842150451,842150451 #### //Corresponded to an actual shot boundary
#### -3,0 ####
#### -2,0 ####
#### -1,0 ####
#### 0,0 ####
#### -1,1 ####
#### -1,1 ####
#### -1,1 ####
#### -1,0 ####
#### -1,1 ####
#### -3,1 ####
#### -2,1 ####
#### -2,1 ####
#### -2,1 ####
#### -3,1 ####
#### -2,1 ####
#### -1,1 ####
#### -1,1 ####
#### -1,1 ####
#### 0,0 ####
#### 0,1 ####
#### 0,1 ####
#### 0,1 ####
#### 0,1 ####
#### 0,0 ####
#### -1,0 ####
#### -1,0 ####
#### -1,0 ####
#### -1,0 ####
#### -2,0 ####
#### -2,0 ####
#### -1,0 ####
#### -2,0 ####
#### -2,0 ####
#### -1,1 ####
#### 0,1 ####
#### 0,1 ####
#### -1,1 ####
#### -1,1 ####
#### -1,2 ####
#### -2,2 ####
#### -3,1 ####
#### -3,0 ####
#### -5,0 ####
#### -3,0 ####
#### -2,0 ####
#### 0,0 ####
#### -1,0 ####
#### -1,0 ####
#### 0,1 ####
#### 0,1 ####
#### 0,0 ####
#### 0,0 ####
#### 0,0 ####
#### 0,0 ####
#### -1,1 ####
#### -1,0 ####
#### -1,0 ####
#### -2,0 ####
#### -1,0 ####
#### 0,1 ####
#### 0,1 ####
#### 0,1 ####
#### 1,1 ####
#### 1,1 ####
#### 1,1 ####
#### 1,0 ####
#### 0,2 ####
#### 0,1 ####
#### 0,1 ####
#### -1,2 ####
#### -1,1 ####
#### -1,2 ####
#### -2,1 ####
#### -2,0 ####
#### -3,0 ####
#### -2,0 ####
#### -2,0 ####
#### -3,0 ####
#### -3,-1 ####
#### -3,0 ####
#### -2,1 ####
#### -4,2 ####
#### -2,2 ####
#### -2,2 ####
#### -4,2 ####
#### -3,2 ####
#### -5,2 ####
#### -3,1 ####
#### -3,0 ####
#### -4,0 ####
#### -5,1 ####
#### -3,1 ####
#### -3,1 ####
#### -3,1 ####
#### -2,2 ####
#### -3,2 ####
#### -1,2 ####
#### -1,1 ####
#### -2,1 ####
#### -3,0 ####
#### -6,0 ####
#### -6,0 ####
#### -5,0 ####
#### -5,0 ####
#### -4,0 ####
#### -6,1 ####
#### -3,1 ####
#### -2,1 ####
#### -2,1 ####
#### -2,1 ####
#### -4,2 ####
#### -4,1 ####
#### -4,1 ####
#### -5,2 ####
#### -10,3 ####
#### -5,1 ####
#### -4,1 ####
#### -4,1 ####
#### -3,1 ####
#### -1,1 ####
#### 0,2 ####
#### -1,1 ####
#### -1,1 ####
#### -2,1 ####
#### -1,1 ####
#### -2,1 ####
#### 842150451,842150451 #### //Corresponded to an actual shot boundary
#### -4,2 ####
#### -3,1 ####
#### 0,0 ####
#### 3,-2 ####
#### 2,-2 ####
#### 1,-1 ####
#### 0,0 ####
#### 5,3 ####
#### 2,2 ####
#### 1,2 ####
#### -1,3 ####
#### -1,1 ####
-Red vectors for optical flow vectors
-Green vectors for median optical flow vector
Input 1
Ouput 1
Input 2
Output 2
Output 2.1
We have also been able to zero pad the whole video, however we had some trouble outputting it to a video so here is a screenshot:

We've also noticed that we might be able to detect shot boundaries with precision. For every frame where we calculate the median optical flow vector, we noticed that at every actual shot boundary there is a large jump of the median optical flow vector values. So we are going to investigate this precision more and compare it to the shot detect software that we were previously using. We then will decide what would be the best approach to the problem. Here is an example of the output of the median vectors:
#### -1,2 ####
#### -1,1 ####
#### -1,2 ####
#### -1,2 ####
#### -1,2 ####
#### -1,2 ####
#### -1,2 ####
#### -1,3 ####
#### -1,3 ####
#### -1,2 ####
#### -1,1 ####
#### -1,1 ####
#### -1,2 ####
#### -1,2 ####
#### -1,2 ####
#### -1,1 ####
#### -1,1 ####
#### 0,2 ####
#### -1,2 ####
#### -1,2 ####
#### -1,2 ####
#### -1,2 ####
#### -1,1 ####
#### -1,1 ####
#### 0,1 ####
#### 0,1 ####
#### 842150451,842150451 #### //Corresponded to an actual shot boundary
#### -3,0 ####
#### -2,0 ####
#### -1,0 ####
#### 0,0 ####
#### -1,1 ####
#### -1,1 ####
#### -1,1 ####
#### -1,0 ####
#### -1,1 ####
#### -3,1 ####
#### -2,1 ####
#### -2,1 ####
#### -2,1 ####
#### -3,1 ####
#### -2,1 ####
#### -1,1 ####
#### -1,1 ####
#### -1,1 ####
#### 0,0 ####
#### 0,1 ####
#### 0,1 ####
#### 0,1 ####
#### 0,1 ####
#### 0,0 ####
#### -1,0 ####
#### -1,0 ####
#### -1,0 ####
#### -1,0 ####
#### -2,0 ####
#### -2,0 ####
#### -1,0 ####
#### -2,0 ####
#### -2,0 ####
#### -1,1 ####
#### 0,1 ####
#### 0,1 ####
#### -1,1 ####
#### -1,1 ####
#### -1,2 ####
#### -2,2 ####
#### -3,1 ####
#### -3,0 ####
#### -5,0 ####
#### -3,0 ####
#### -2,0 ####
#### 0,0 ####
#### -1,0 ####
#### -1,0 ####
#### 0,1 ####
#### 0,1 ####
#### 0,0 ####
#### 0,0 ####
#### 0,0 ####
#### 0,0 ####
#### -1,1 ####
#### -1,0 ####
#### -1,0 ####
#### -2,0 ####
#### -1,0 ####
#### 0,1 ####
#### 0,1 ####
#### 0,1 ####
#### 1,1 ####
#### 1,1 ####
#### 1,1 ####
#### 1,0 ####
#### 0,2 ####
#### 0,1 ####
#### 0,1 ####
#### -1,2 ####
#### -1,1 ####
#### -1,2 ####
#### -2,1 ####
#### -2,0 ####
#### -3,0 ####
#### -2,0 ####
#### -2,0 ####
#### -3,0 ####
#### -3,-1 ####
#### -3,0 ####
#### -2,1 ####
#### -4,2 ####
#### -2,2 ####
#### -2,2 ####
#### -4,2 ####
#### -3,2 ####
#### -5,2 ####
#### -3,1 ####
#### -3,0 ####
#### -4,0 ####
#### -5,1 ####
#### -3,1 ####
#### -3,1 ####
#### -3,1 ####
#### -2,2 ####
#### -3,2 ####
#### -1,2 ####
#### -1,1 ####
#### -2,1 ####
#### -3,0 ####
#### -6,0 ####
#### -6,0 ####
#### -5,0 ####
#### -5,0 ####
#### -4,0 ####
#### -6,1 ####
#### -3,1 ####
#### -2,1 ####
#### -2,1 ####
#### -2,1 ####
#### -4,2 ####
#### -4,1 ####
#### -4,1 ####
#### -5,2 ####
#### -10,3 ####
#### -5,1 ####
#### -4,1 ####
#### -4,1 ####
#### -3,1 ####
#### -1,1 ####
#### 0,2 ####
#### -1,1 ####
#### -1,1 ####
#### -2,1 ####
#### -1,1 ####
#### -2,1 ####
#### 842150451,842150451 #### //Corresponded to an actual shot boundary
#### -4,2 ####
#### -3,1 ####
#### 0,0 ####
#### 3,-2 ####
#### 2,-2 ####
#### 1,-1 ####
#### 0,0 ####
#### 5,3 ####
#### 2,2 ####
#### 1,2 ####
#### -1,3 ####
#### -1,1 ####
Wednesday, January 13, 2010
Shot Detect Performance
We are still having problems with compiling the Shot Detect software. For now, we will use the shot detect executable to get an idea of how well it performs. We ran shot detect on 4 videos from our dataset. Eventually we will implement this performance check on our entire Dataset. The results are as follows...
We define Error as (Undetected Shots + False Positives) / Total # of Shots
Song 1 -
52 shots
Undetected Shots - 5
False Positives - 0
Error - .096
Song 2 -
57 shots
Undetected Shots - 5
False Positives - 0
Error - .087
Song 3 -
49 shots
Undetected Shots - 2
False Positives - 4
Error - .122
Song 4 -
27 shots
Undetected Shots - 10
False Positives - 2
Error - .444
The nature of the first three songs is such that the shot detection is very obvious to the human eye. Song 4 isn't so obvious, i.e. at times, there are effects like dissolve and fade between shots. These sorts of transition between shots are not detected by the shot detect program.
Subscribe to:
Posts (Atom)